In this article, we will see how to set up Parse Server and Parse Dashboard with Docker. This environment can be used in development and in production.
What are Parse Server and Parse Dashboard?
Parse Server is an open-source version of the Parse.com BaaS (backend as a service). Parse Server lets you quickly set up a backend for your web or mobile application. Parse Dashboard is an interface that, among other things, lets you view and edit database data, view logs, and run certain tests against the API.
Parse Server provides a number of features:
- User management
- Data access management
- REST API
- SDKs for different platforms (JS, iOS, Android, and so on)
- The ability to write your own functions for more complex processing
- ...
This is only a non-exhaustive list of the available features. Visit the GitHub repository to learn more about the full range of possibilities.
Article objective
The goal of this article is to configure a Parse Server environment with Docker while meeting the following requirements:
- The ability to use ES6 syntax in Cloud functions
- Use this environment in development without having to rebuild the Docker image
The end goal is to use this environment to quickly start a new project without having to modify it later for production.
To do that, we will use the following elements:
- Babel
- nodemon
- Docker
- Docker-compose
Setting up Parse Server and the dashboard
To start, create a folder that will contain the whole project, then inside that folder create a new folder named parse-server.
mkdir parse-server-sample && cd parse-server-sample
mkdir parse-server && cd parse-server
Then we add a package.json file containing the required dependencies:
{
  "name": "parse-server-sample",
  "version": "1.0.0",
  "description": "Basic Parse Server Sample",
  "dependencies": {
    "express": "^4.16.4",
    "parse-dashboard": "^1.2.0",
    "parse-server": "^3.1.3"
  },
  "devDependencies": {
    "babel-cli": "^6.26.0",
    "babel-preset-env": "^1.7.0"
  }
}
Now we need to add the npm scripts that will let us start the server.
  "scripts": {
    "clean": "rm -rf build && mkdir build",
    "build-server": "babel -d ./build ./server -s",
    "build": "npm run clean && npm run build-server",
    "start": "npm run build && node ./build/index.js",
    "dev": "babel-node ./server/index.js"
  }
The operating principle is as follows:
When we are in development, we will use babel-node to start the server. babel-node will automatically transform our code when the command is executed.
However, in production we will not use babel-node to start the server. First, we will use Babel to transform our code, then start our server normally with Node, telling it to use the Babel-transformed code located in the build folder.
To finish, we add a .babelrc file in our parse-server folder with the following code:
{
  "presets": ["env"]
}
This tells Babel which presets to use when transforming the code.
Now we can add the entry point for our server. Create a server folder and add an index.js file inside it.
mkdir server && cd server
touch index.js
In this index.js file, we will configure Parse Server and Parse Dashboard.
First, we add the required dependencies:
var express = require('express')
var ParseServer = require('parse-server').ParseServer
var ParseDashboard = require('parse-dashboard')
Then we define our Parse server options from environment variables:
const mountPath = process.env.PARSE_MOUNT || '/parse'
const port = process.env.PORT || 1337
const databaseURI = process.env.DATABASE_URI || 'mongodb://localhost:27017/dev'
const cloudPath = __dirname + '/cloud/main.js'
const appId = process.env.APP_ID || 'myAppId'
const masterKey = process.env.MASTER_KEY || ''
const serverURL = process.env.SERVER_URL || 'http://localhost:1337/parse'
const logLevel = process.env.LOG_LEVEL || 'info'
const allowInsecureHTTP = process.env.ALLOW_INSECURE_HTTP_DASHBOARD
const appName = process.env.APP_NAME
const dashboard_user = process.env.DASHBOARD_USER
const dashboard_password = process.env.DASHBOARD_PASSWORD
Then we instantiate Parse Server and Parse Dashboard with the previous options:
var api = new ParseServer({
  databaseURI: databaseURI,
  cloud: cloudPath,
  appId: appId,
  masterKey: masterKey,
  serverURL: serverURL,
  logLevel: logLevel,
})

var dashboard = new ParseDashboard(
  {
    apps: [
      {
        serverURL: serverURL,
        appId: appId,
        masterKey: masterKey,
        appName: appName,
      },
    ],
    users: [
      {
        user: dashboard_user,
        pass: dashboard_password,
        apps: [{ appId: appId }],
      },
    ],
  },
  //options
  { allowInsecureHTTP: allowInsecureHTTP }
)
Finally, we define which routes the server and dashboard will be accessible on, and we start the server.
var app = express()
app.use(mountPath, api)
app.use('/dashboard', dashboard)

var httpServer = require('http').createServer(app)
httpServer.listen(port, function () {
  console.log('parse-server running on port ' + port + '.')
})
At this point in the installation, we could use the basic features of Parse Server. However, as we saw in the introduction, Parse lets us write our own functions to perform more complex processing. These functions are used in what is called Cloud Code.
In the Parse configuration, we indicated that the Cloud Code is located by default in the main.js file in the cloud folder.
const cloudPath = __dirname + '/cloud/main.js'We only need to create this folder and add this file:
mkdir cloud && cd cloud
touch main.js
To test that our server works correctly, we will add a simple function in our Cloud Code that we will use later in the article.
Parse.Cloud.define('test', (request, response) => {
  return { hello: 'world' }
})
That's it: our server and dashboard are ready. All that remains is to configure Docker and Docker Compose.
Creating the Dockerfile
First, we will create the Dockerfile that lets us build the image for our Parse server.
In the parse-server folder, add the Dockerfile file:
FROM node:8
RUN npm install -g nodemon
RUN mkdir parse
ADD . /parse
WORKDIR /parse
RUN npm install
EXPOSE 1337
CMD [ "npm", "start" ]
Nothing complicated here: we start from the node:8 base image, then install nodemon. We will see why it is useful shortly.
Then we copy the contents of the parse-server folder into our container.
Finally, we tell Docker to build the server and then run it with the npm start command.
Creating the docker-compose.yml file
To finish configuring the environment, all that remains is to create the docker-compose.yml file at the root of our project:
version: '2'
services:
  mongo:
    image: 'bitnami/mongodb:latest'
    container_name: 'tutorial-mongo-db'
    restart: always
    ports:
      - '27017:27017'
    environment:
      MONGODB_ROOT_PASSWORD: 'MONGODB_ROOT_PASSWORD'
      MONGODB_USERNAME: 'user'
      MONGODB_PASSWORD: 'MONGODB_PASSWORD'
      MONGODB_DATABASE: 'db_name'
    volumes:
      - ./mongo:/bitnami
  api:
    build: ./parse-server
    image: tutorial/parse-server
    container_name: 'tutorial-parse-server'
    restart: always
    ports:
      - '1337:1337'
    environment:
      PARSE_MOUNT: '/parse'
      PORT: 1337
      DATABASE_URI: mongodb://user:MONGODB_PASSWORD@mongo:27017/db_name
      APP_ID: 'APP_ID'
      MASTER_KEY: 'MASTER'
      SERVER_URL: 'http://localhost:1337/parse'
      LOG_LEVEL: 'error'
      ALLOW_INSECURE_HTTP_DASHBOARD: 'true'
      APP_NAME: 'Parse Server Sample'
      DASHBOARD_USER: 'User'
      DASHBOARD_PASSWORD: 'password'
    depends_on:
      - mongo
Here, we use the mongo-db image provided by Bitnami for our database service. Then, for our Parse server, we tell Docker to build the image from the Dockerfile located in the parse-server folder.
We also define the environment variables used in the index.js file of our Parse server.
Now you can start the services with the command:
docker-compose upGo to http://localhost:1337/parse. You should see the following message:
{"error":"unauthorized"}Then, if you go to http://localhost:1337/dashboard/login, you should see the dashboard login interface.
Log in with the following credentials: User / password, or the ones defined in the docker-compose.yml file if you changed them.
To test that our Cloud Code works correctly, go to the API Console section. Enter the same information as below:
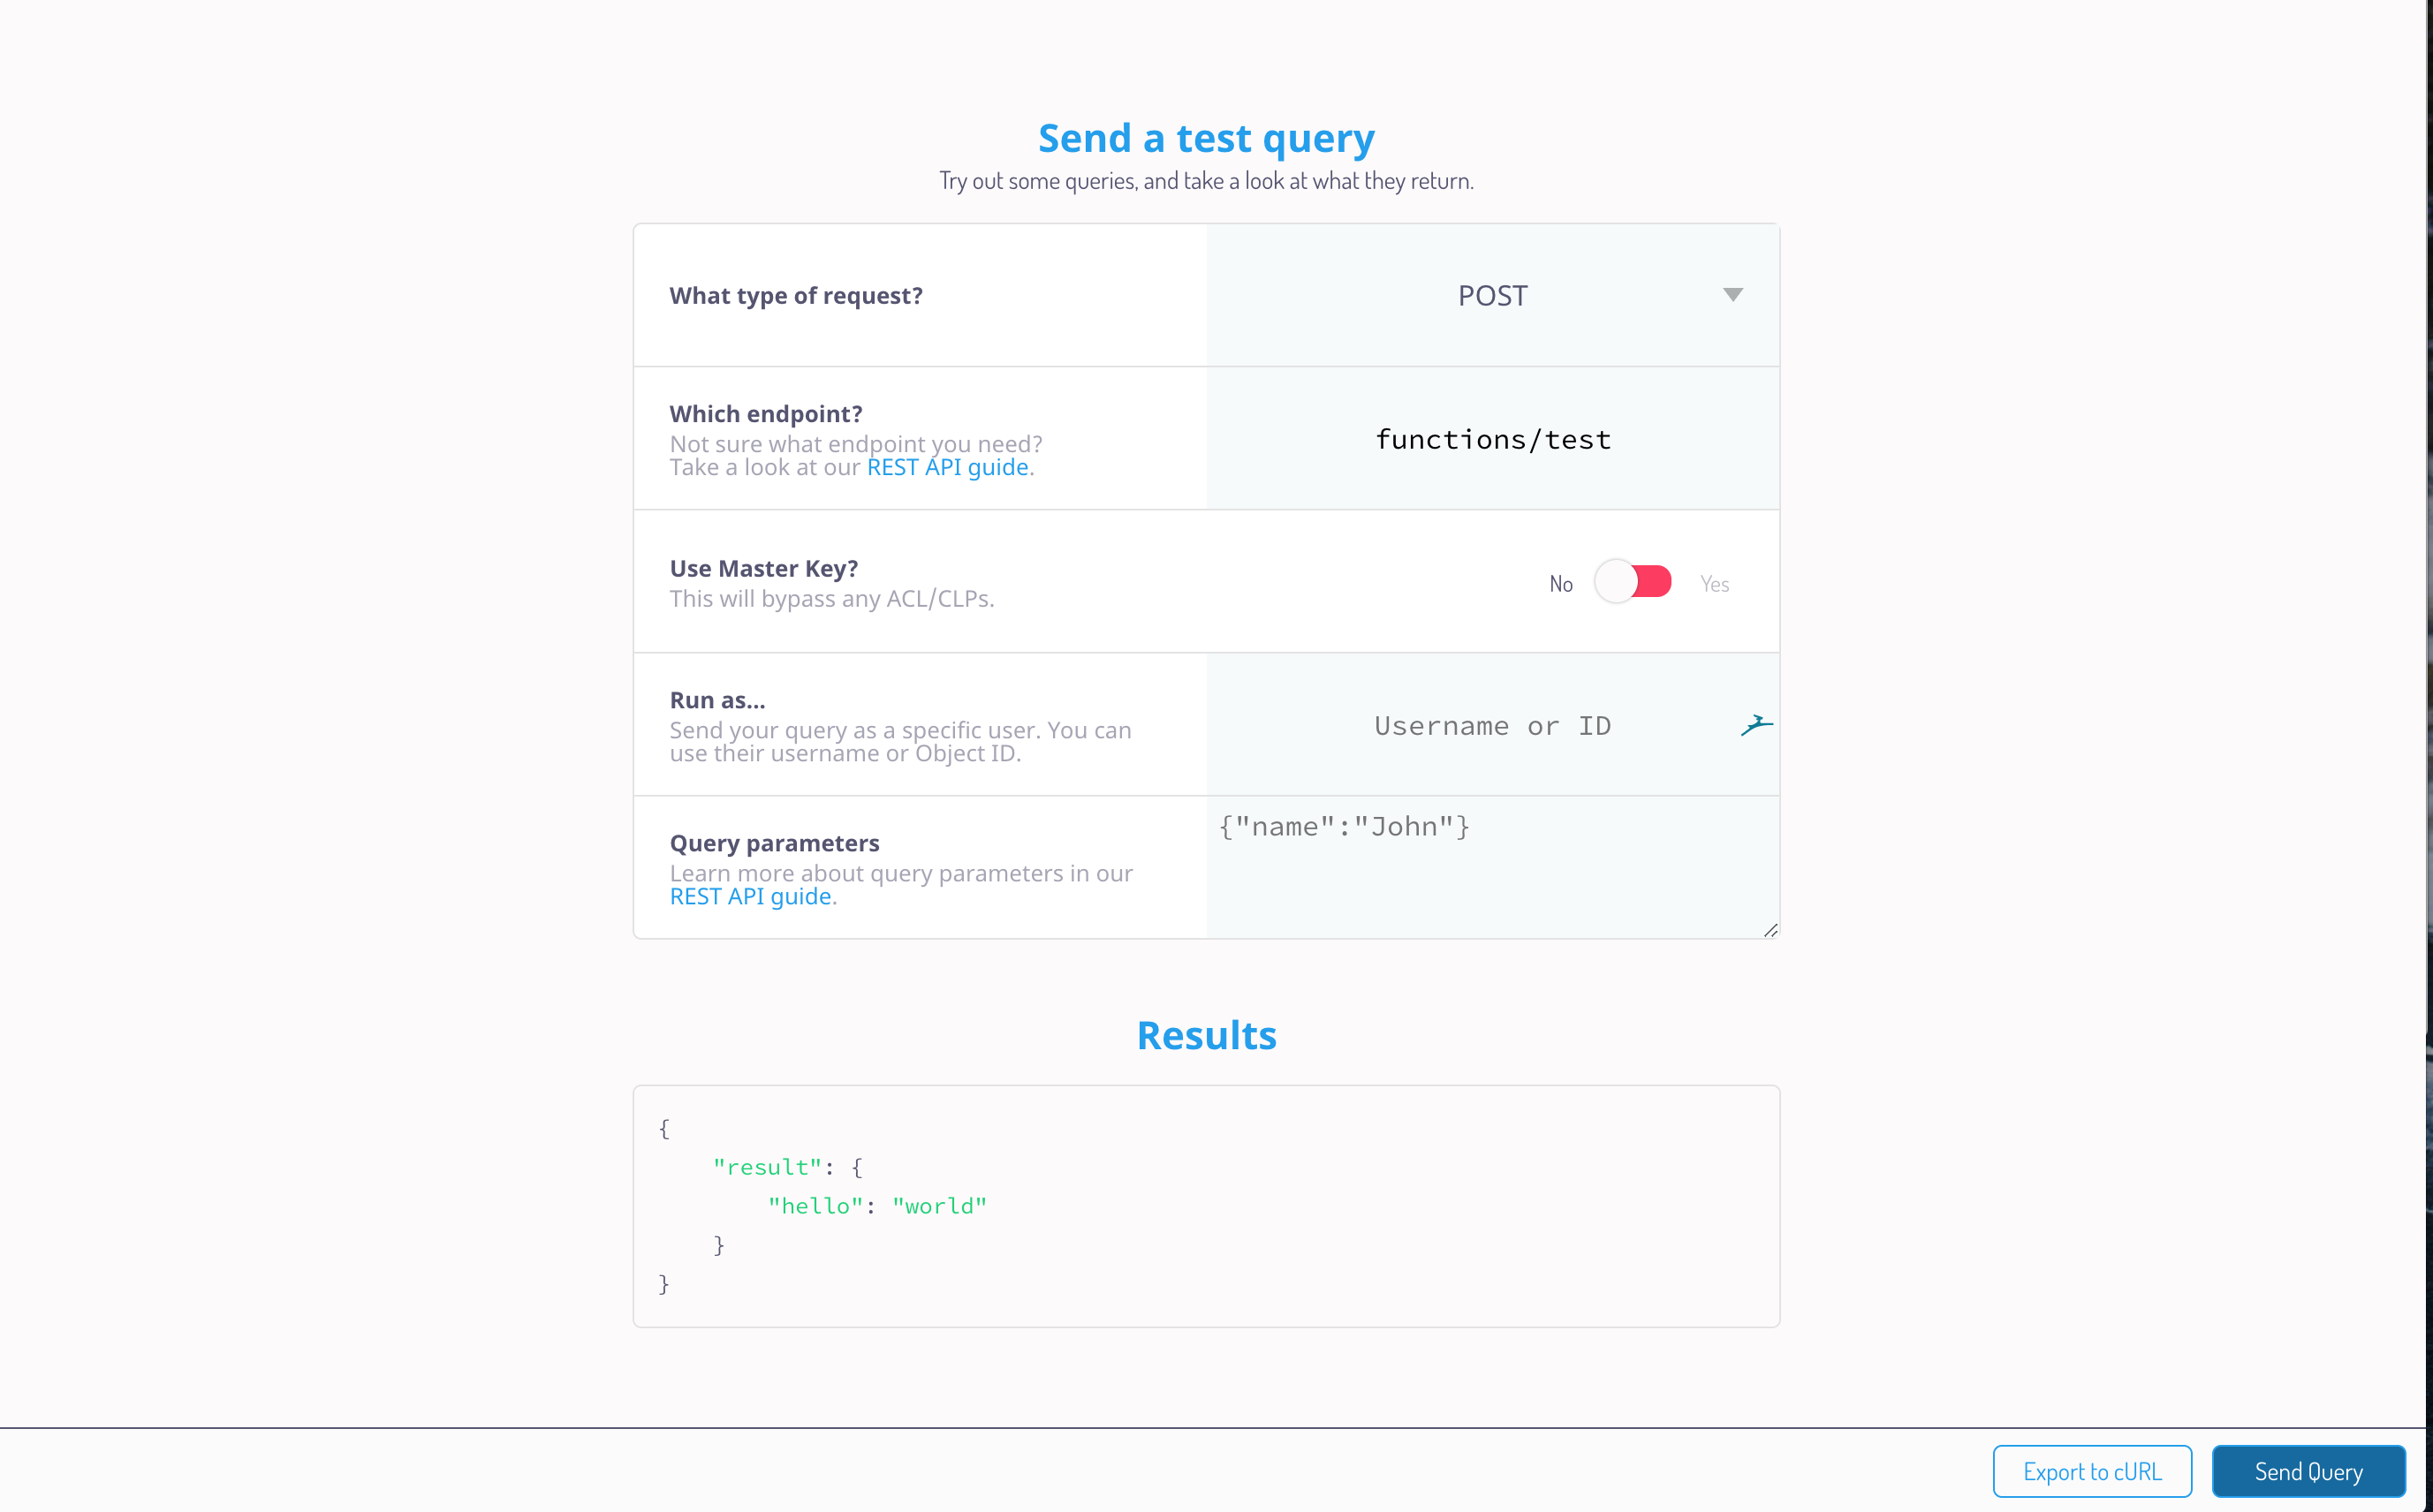
If everything works correctly, you should get the same result as in the previous image.
What about development?
Currently, if we make a change in our Cloud Code function or in the index.js file, these changes are not taken into account. This is completely normal because the code we modify on our machine is not the code inside the Docker container.
The base Dockerfile copies the code from our machine and then runs the npm-start command, which transforms the code and then tells Node.js to start the server from the build folder.
The only way for changes to be taken into account is to rerun docker-compose up with the --build option, which rebuilds our server image.
Fortunately, we can change this behavior very simply. Remember that we installed nodemon in our Dockerfile; this is where it comes into play. nodemon will watch our server files and automatically restart the server when changes are detected.
Thanks to docker-compose, we can change the command executed by our container at startup. To do this, add the following option to the api service in our docker-compose.yml file:
command: nodemon --exec npm run devIn this case, when our container starts, we will use nodemon to run the npm dev script, which uses babel-node.
Finally, so that the changes we make on our machine are also present in the container, we need to add the following volume:
volumes:
  - ./parse-server/server/:/parse/server
That's it: now every change you make in the server folder is taken into account.
You can therefore use this environment for development. Then, once you want to deploy, you only need to remove the volume and the command so your environment can be used in production.
Final recommendations
If you use this configuration in production, be sure to replace the environment variables, especially the dashboard and database access values, with secure values.
Make the dashboard inaccessible over HTTP by setting the ALLOW_INSECURE_HTTP_DASHBOARD variable to false. This will make the dashboard accessible only through HTTPS, so you will need to add a reverse proxy with a domain and SSL certificate to your configuration (we will see how to do that in another article).
If you want, when deploying to production you can remove the nodemon installation from the Dockerfile.