This article is the fourth in the series whose goal is to create a Docker-based web application. In this article, we will create the Next.js application. This application will be a simple todo list.
Here is the list of data the application will contain:
TodoList
- label (string)
- objectId (default Parse field)
- updatedAt (default Parse field)
- createdAt (default Parse field)
- ACL (default Parse field)
TodoItems
- label (string)
- isDone (boolean)
- todoList (Pointer)
- objectId (default Parse field)
- updatedAt (default Parse field)
- createdAt (default Parse field)
- ACL (default Parse field)
Initializing the data
To begin, we will create the data in Parse using the dashboard.
docker-compose upThen go to the dashboard; you should see this:
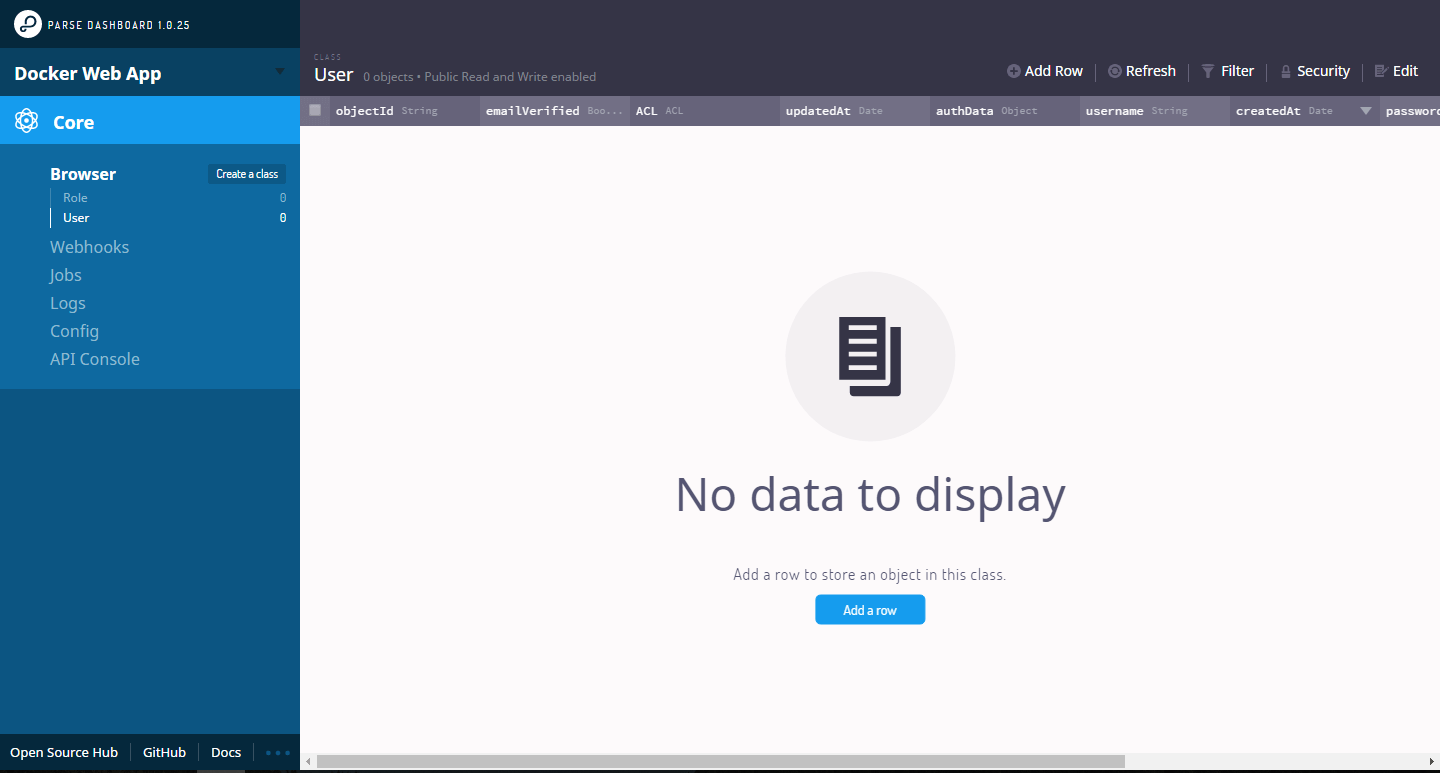
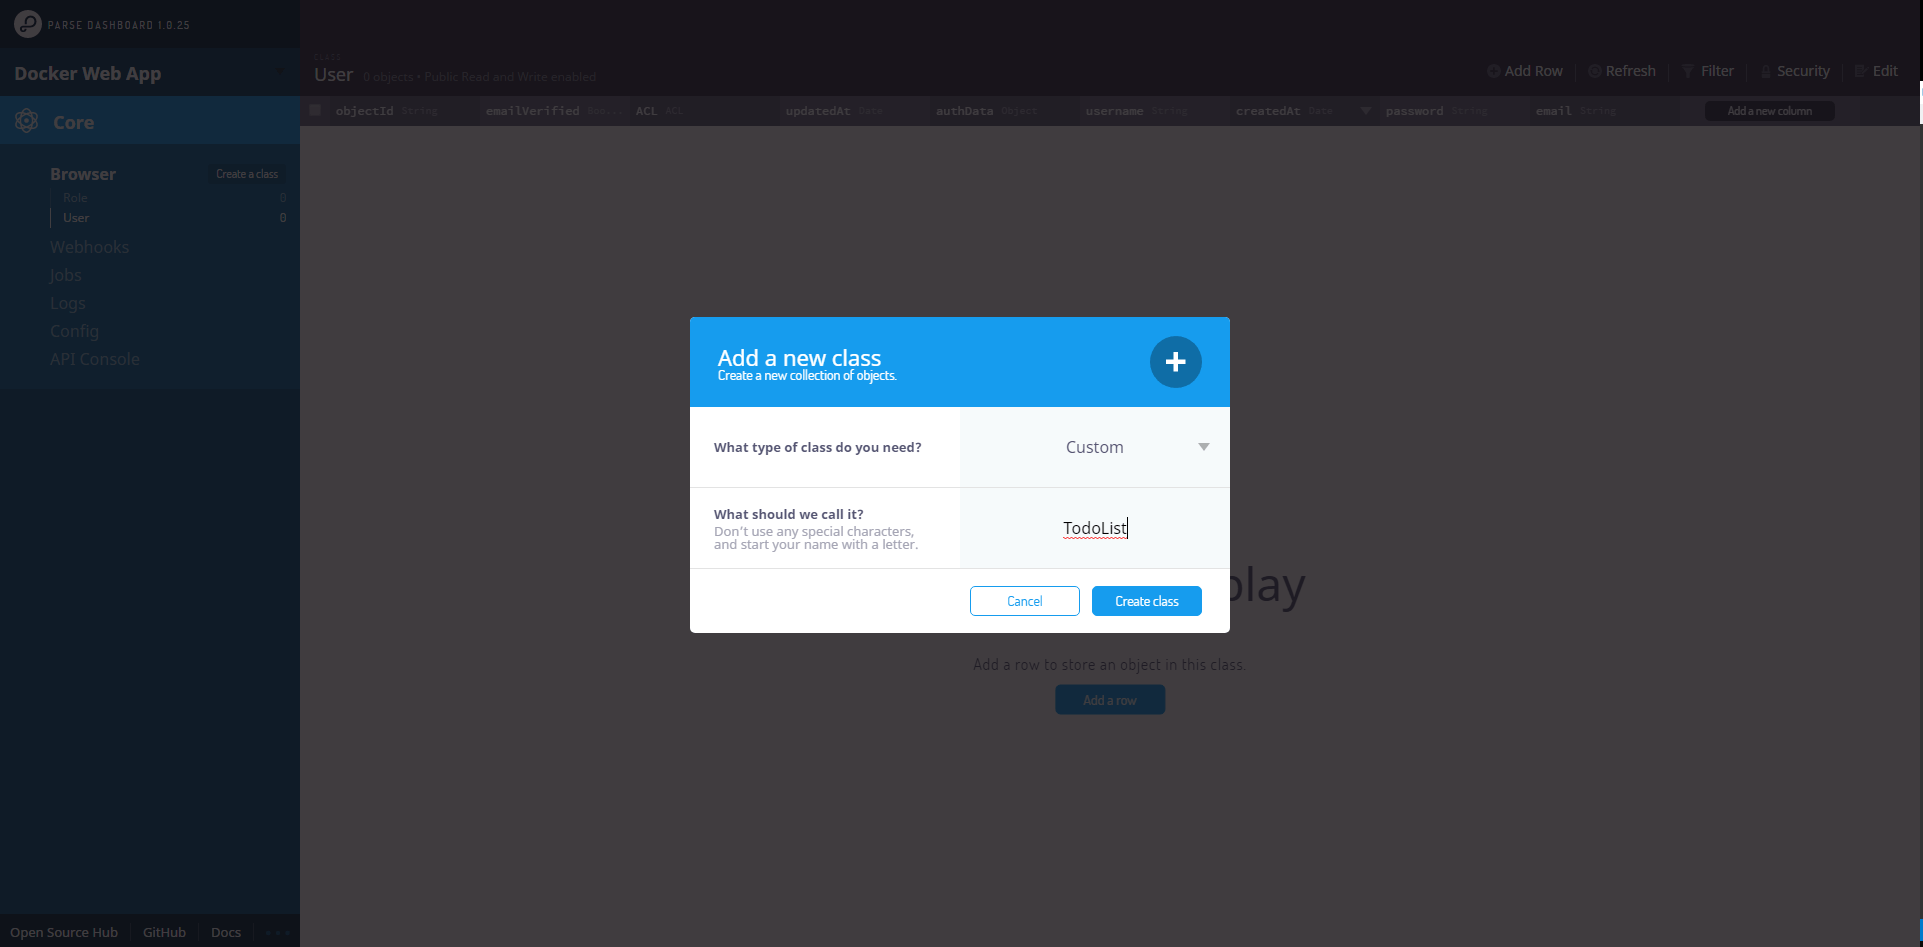
Click the "Create a Class" button and add the TodoList class.
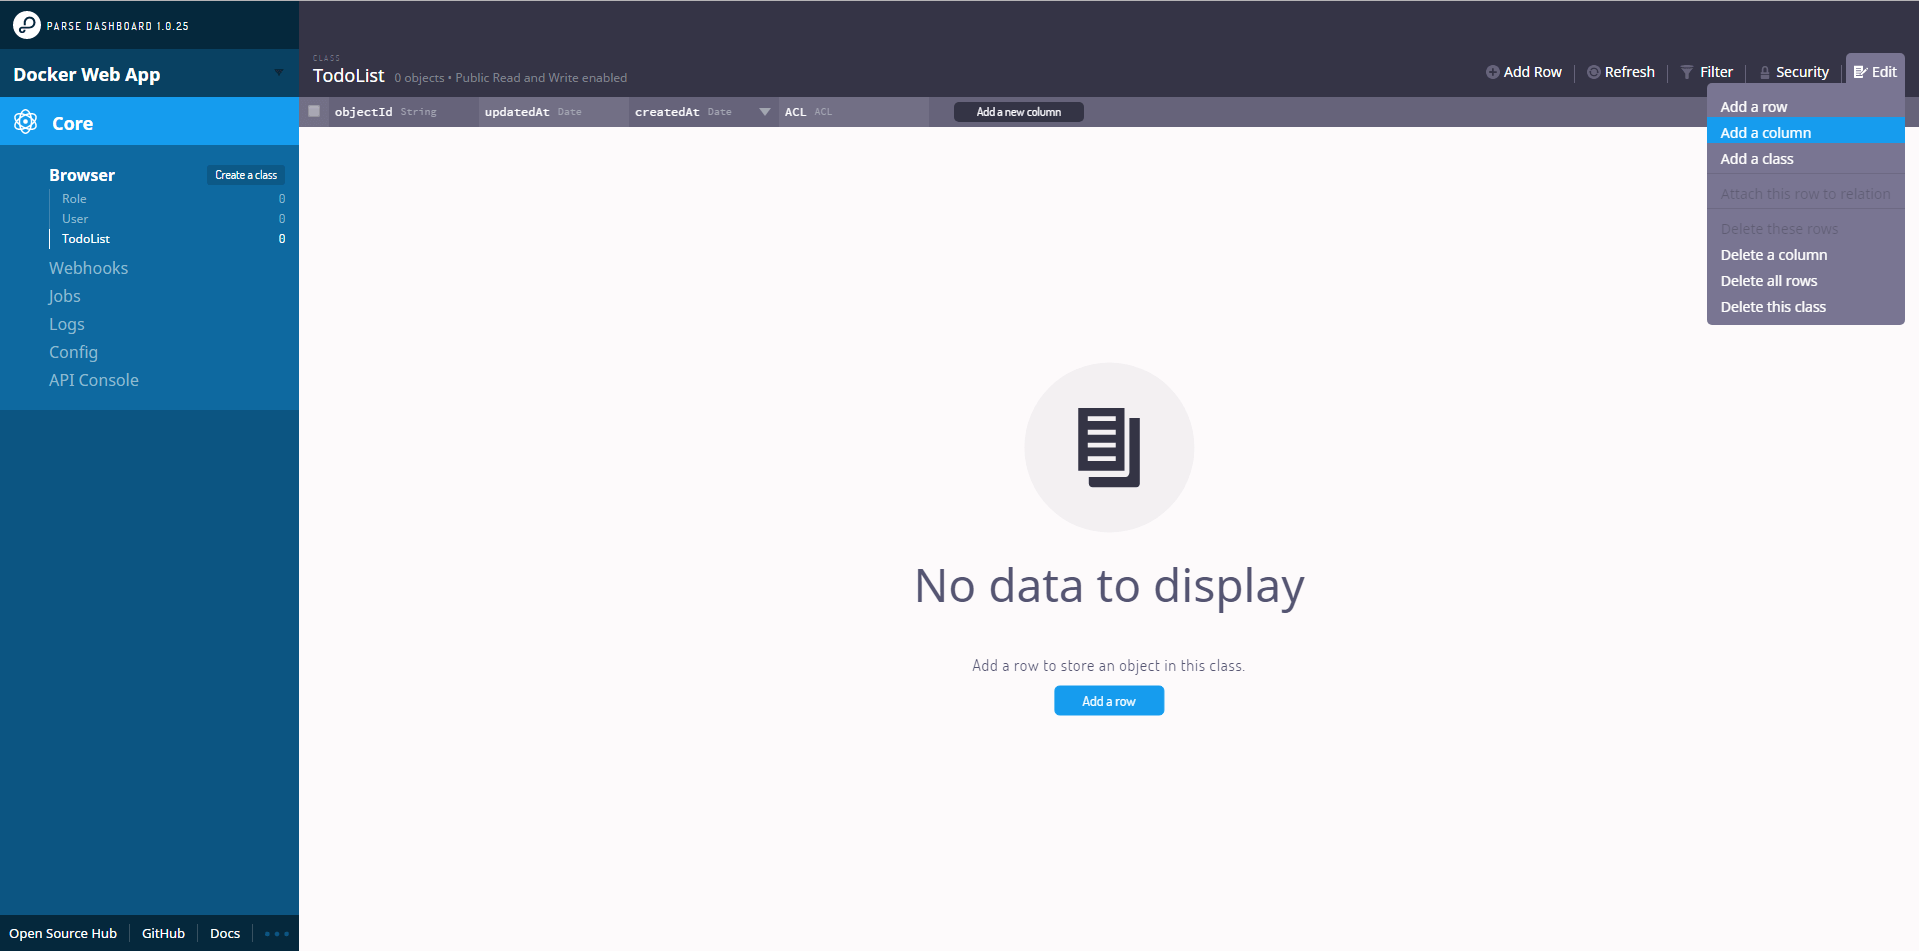
Next, we will add the label column. Click "Edit", then "Add a column".
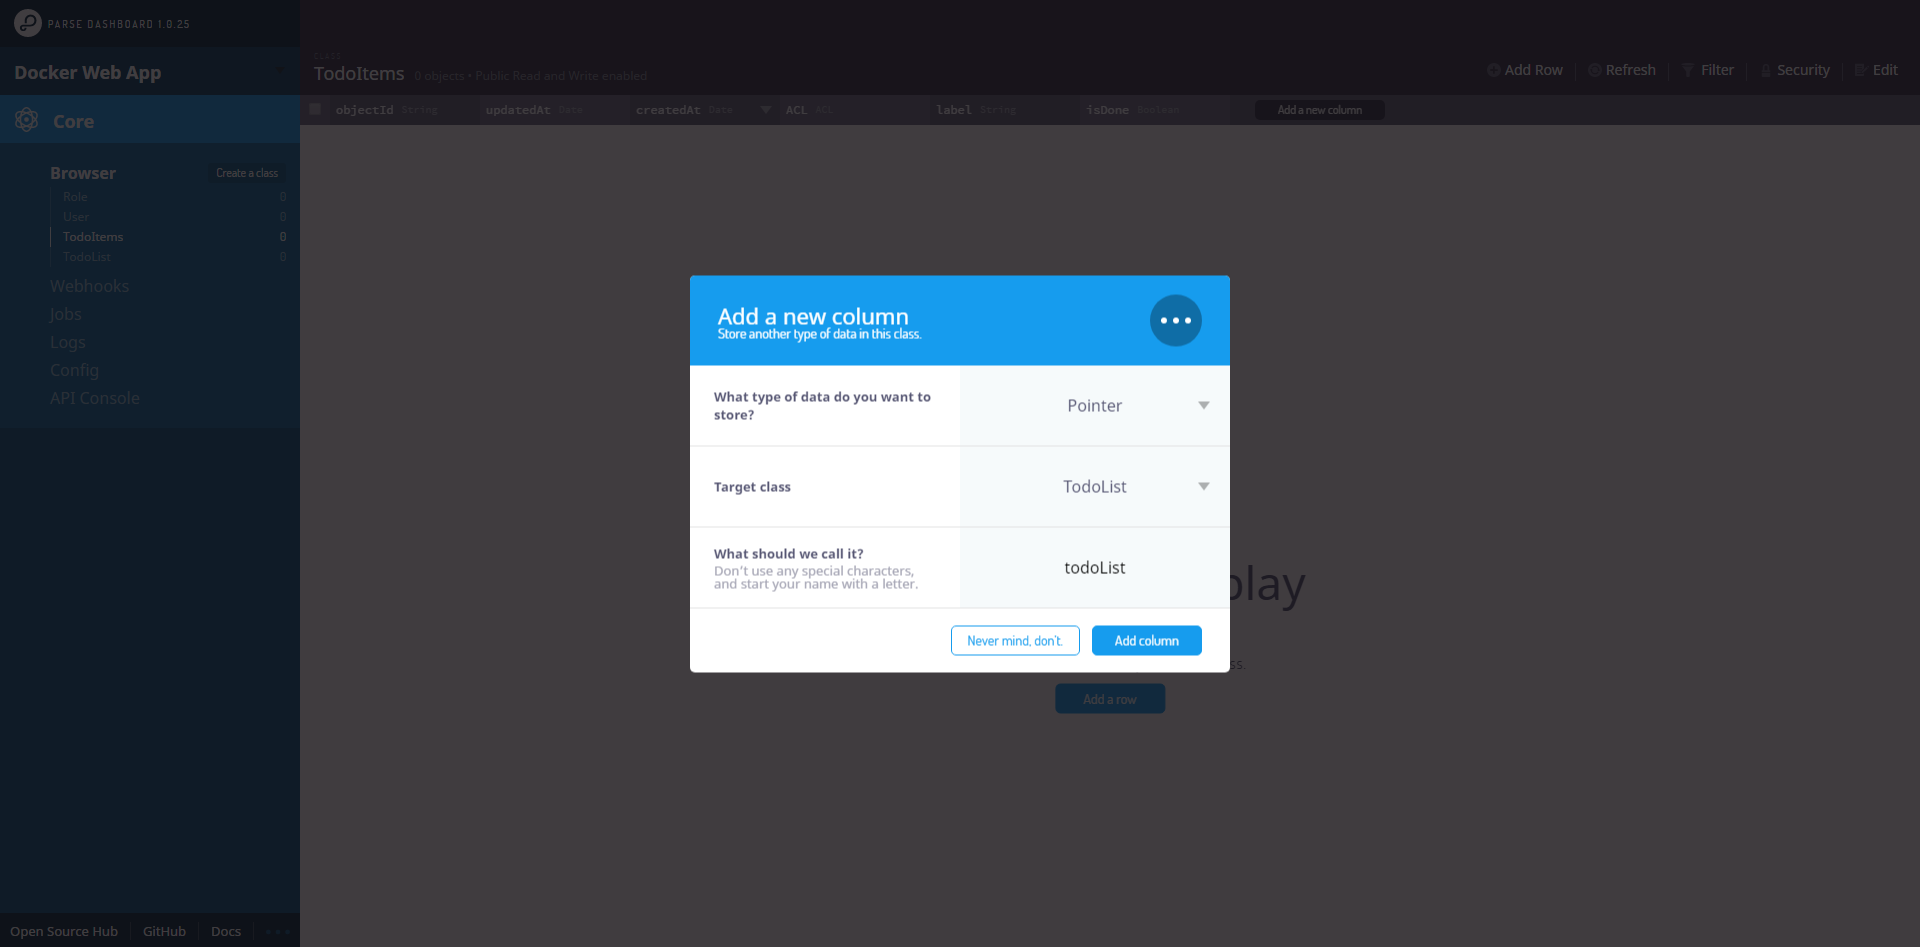
Select the type and confirm.
Repeat the same steps for the TodoItems class, taking the field types into account.
Make sure you select the TodoList class when adding the pointer-type field.
Initializing Next.js
Now that the data structure is in place, let's move on to the application. Start by initializing the project:
mkdir web-app
cd web-app
yarn add next react react-dom parse
Next, add the following code to package.json:
"scripts": {
    "dev": "next",
    "build": "next build",
    "start": "next start"
  }
Create a pages folder and add an index.js file with the following code:
export default () => <h1>Hello Next.js !</h1>Run the command:
npm run devThe application will start and will be accessible at http://localhost:3000.
To finish, we will create a config.js file at the root of the web-app folder. Later, we will need the app ID and Parse Server URL, so we will store this information in that file.
export const PARSE_APP_ID = 'web-app-docker'
export const PARSE_SERVER_URL = 'http://localhost:1337/parse'
The configuration is now complete.
Creating components and pages
The application will be made up of four components:
- TodoList.js
- TodoItems.js
- AddItem.js
- Layout.js
These components will be used in two different pages:
- index
- todolist
The components will be located in the components folder.
Let's start with the layout:
Layout.js
import Head from 'next/head'

export default ({ children, title = 'Default layout title' }) => (
  <div>
    <Head>
      <title>{title}</title>
      <meta charSet="utf-8" />
      <meta name="viewport" content="initial-scale=1.0, width=device-width" />
      <link rel="stylesheet" href="https://cdnjs.cloudflare.com/ajax/libs/font-awesome/4.7.0/css/font-awesome.css" />
    </Head>

    {children}

    <style global jsx>{`
      html {
        font-family: arial;
      }
      body {
        display: flex;
        align-items: center;
        justify-content: center;
      }
    `}</style>
  </div>
)
Let's move on to the AddItem component, which will be used to add TodoList and TodoItems objects.
AddItem.js
export default ({ addItem, placeholder }) => {
  let input

  return (
    <div className="add-itm-ctnr">
      <input ref={el => (input = el)} placeholder={placeholder} type="text" />
      <button className="btn" onClick={() => addItem(input.value)}>
        Add
      </button>

      <style global jsx>{`
        .add-itm-ctnr {
          display: flex;
          justify-content: space-between;
          min-width: 576px;
          margin-bottom: 32px;
        }
        input[type='text'] {
          display: block;
          margin: 0;
          width: 350px;
          font-family: sans-serif;
          font-size: 18px;
          appearance: none;
          box-shadow: none;
          border-radius: none;
          height: 35px;
          padding: 8px;
        }
        input[type='text']:focus {
          outline: none;
        }
        .btn {
          background-color: #4ca6af;
          border: none;
          color: white;
          padding: 15px 32px;
          text-align: center;
          text-decoration: none;
          display: inline-block;
          font-size: 16px;
          outline: 0;
        }
        .btn:hover {
          cursor: pointer;
          background-color: #34777d;
        }
      `}</style>
    </div>
  )
}
Now we will add the TodoList component, which will let us view, select, and delete TodoList objects.
TodoList.js
export default ({ todolist, deleteTodolist, showTodoList }) => {
  const items = todolist.map(item => (
    <li key={item.id} onClick={() => showTodoList(item.id)}>
      <span>{item.get('label')}</span>
      <i
        className="fa fa-trash ic-delete"
        onClick={event => {
          event.stopPropagation()
          deleteTodolist(item.id)
        }}
      />
    </li>
  ))

  return (
    <div>
      <ul className="todolist">{items}</ul>

      <style global jsx>{`
        .todolist {
          list-style-type: none;
          padding: 0px;
        }
        .todolist li {
          width: 550px;
          height: 50px;
          display: flex;
          align-items: center;
          padding: 12px;
          border: solid 1px #d0d0d0;
          font-size: 22px;
          font-weight: 500;
          margin-bottom: 12px;
          border-radius: 2px;
          justify-content: space-between;
          color: #333;
          -moz-box-shadow: 4px 6px 8px 0px #c0c0c0;
          -webkit-box-shadow: 4px 6px 8px 0px #c0c0c0;
          -o-box-shadow: 4px 6px 8px 0px #c0c0c0;
          box-shadow: 4px 6px 8px 0px #c0c0c0;
        }
        .todolist li:hover {
          -moz-box-shadow: 2px 4px 8px 0px #c0c0c0;
          -webkit-box-shadow: 2px 4px 8px 0px #c0c0c0;
          -o-box-shadow: 2px 4px 8px 0px #c0c0c0;
          box-shadow: 2px 4px 8px 0px #c0c0c0;
          cursor: pointer;
        }
        .ic-delete {
          color: #d0d0d0;
        }
        .ic-delete:hover {
          color: red;
        }
      `}</style>
    </div>
  )
}
And finally, the TodoItems component, which lets us view, edit, and delete TodoItems objects.
TodoItems.js
export default ({ todoListItems, removeItem, checkItem }) => {
  const items = todoListItems.map(item => {
    const visibility = item.get('isDone') ? 'visible' : 'hidden'

    return (
      <li onClick={() => checkItem(item.id)} key={item.id}>
        <span>
          <i className="fa fa-check" style={{ visibility, color: 'green', marginRight: 16 }} />
          {item.get('label')}
        </span>
        <i
          className="fa fa-trash ic-delete"
          onClick={event => {
            event.stopPropagation()
            removeItem(item.id)
          }}
        />
      </li>
    )
  })

  return (
    <div>
      <ul className="items">{items}</ul>

      <style global jsx>{`
        .items {
          list-style-type: none;
          padding: 0px;
        }
        .items li {
          width: 550px;
          height: 35px;
          display: flex;
          align-items: center;
          padding: 12px;
          border: solid 1px #d0d0d0;
          font-size: 16px;
          justify-content: space-between;
          color: #333;
        }
        .items li:hover {
          cursor: pointer;
        }
        .ic-delete {
          color: #d0d0d0;
        }
        .ic-delete:hover {
          color: red;
        }
      `}</style>
    </div>
  )
}
Now that the components have been created, we will move on to the pages.
Replace the code in the index.js page with the following:
import React from 'react'
import Router from 'next/router'
import Parse from 'parse'

import Layout from '../components/Layout'
import AddItem from '../components/AddItem'
import TodoList from '../components/TodoList'

import { PARSE_APP_ID, PARSE_SERVER_URL } from '../config.js'

export default class extends React.Component {
  constructor() {
    super()
    this.state = {
      todoLists: [],
      isFetching: true,
    }
    Parse.initialize(PARSE_APP_ID)
    Parse.serverURL = PARSE_SERVER_URL
  }

  async componentDidMount() {}

  async _showTodoList(id) {}

  async _addTodoList(value) {}

  async _deleteTodoList(id) {}

  render() {
    return (
      <Layout title="Next / Parse Todolist sample">
        <h1>Next JS TodoList</h1>
        <AddItem addItem={value => this._addTodoList(value)} placeholder="Add a new list" />
        {this.renderContent()}
      </Layout>
    )
  }

  renderContent() {
    if (this.state.isFetching) {
      return (
        <div style={{ textAlign: 'center', color: '#4ca6af' }}>
          <i className="fa fa-circle-o-notch fa-spin fa-2x" />
        </div>
      )
    } else {
      return (
        <TodoList
          todolist={this.state.todoLists}
          showTodoList={id => this._showTodoList(id)}
          deleteTodolist={id => this._deleteTodoList(id)}
        />
      )
    }
  }
}- We import React, Parse, and the Next router, which will let us navigate to the second page.
- We import the required components.
- We define the component's initial state and initialize Parse with the app ID and URL values from config.js.
- We define all the methods where we will add the code that interacts with Parse.
The first thing we will do is retrieve the list of TodoList objects. Add the following code to the componentDidMount method:
var TodoList = Parse.Object.extend('TodoList')
var query = new Parse.Query(TodoList)
query.descending('createdAt')
try {
  var data = await query.find()
  this.setState({
    isFetching: false,
    todoLists: data,
  })
} catch (error) {
  alert(error.message)
  this.setState({
    isFetching: false,
  })
}
Here we define a simple query that retrieves all TodoList objects. Once they are retrieved, we update the state with the list we got back.
Next, we add the code for the _addTodoList method:
if (value.length > 0) {
  var TodoList = Parse.Object.extend('TodoList')
  var todoList = new TodoList()
  todoList.set('label', value)

  try {
    var res = await todoList.save()
    this.setState({
      todoLists: [res, ...this.state.todoLists],
    })
  } catch (error) {
    alert(error.message)
  }
}
Then the code for the _deleteTodoList method:
const idx = this.state.todoLists.findIndex(obj => obj.id == id)
const currentTodoList = this.state.todoLists.find(obj => obj.id == id)
try {
  await currentTodoList.destroy()
  this.setState({
    todoLists: this.state.todoLists.slice(0, idx).concat(this.state.todoLists.slice(idx + 1)),
  })
} catch (error) {
  alert(error.message)
}
To finish with the index page, we add the code for the _showTodoList method:
Router.push({
  pathname: '/todolist',
  query: { id: id },
})
Here we use the Next router. We specify the page with pathname, as well as the todolist ID with query.
Let's create the todolist page. Create a todolist.js file in the pages folder and add the following code:
import React from 'react'
import TodoItems from '../components/TodoItems'
import AddItem from '../components/AddItem'
import Layout from '../components/Layout'

import Parse from 'parse'

import { PARSE_APP_ID, PARSE_SERVER_URL } from '../config.js'

export default class extends React.Component {
  constructor() {
    super()
    this.state = {
      items: [],
      isFetching: true,
      todoList: {},
    }
    Parse.initialize(PARSE_APP_ID)
    Parse.serverURL = PARSE_SERVER_URL
  }

  async componentDidMount() {
    // Retrieve the todoList
    var TodoList = Parse.Object.extend('TodoList')
    var query = new Parse.Query(TodoList)
    query.equalTo('objectId', this.props.url.query.id)
    try {
      var _todoList = await query.first()
      if (_todoList) {
        var TodoItems = Parse.Object.extend('TodoItems')
        var query = new Parse.Query(TodoItems)
        query.equalTo('todoList', _todoList)
        var _items = await query.find()
        this.setState({
          isFetching: false,
          todoList: _todoList,
          items: _items,
        })
      } else {
        alert('Invalid ID')
      }
    } catch (error) {
      alert(error.message)
    }
  }

  async _addItem(value) {}

  async _deleteItem(id) {}

  async _checkItem(id) {}

  render() {
    return <Layout title="Next / Parse Todolist sample">{this.renderContent()}</Layout>
  }

  renderContent() {
    if (this.state.isFetching) {
      return (
        <div style={{ textAlign: 'center', color: '#4ca6af' }}>
          <i className="fa fa-circle-o-notch fa-spin fa-2x" />
        </div>
      )
    } else {
      return (
        <div>
          <h3>{this.state.todoList.get('label')}</h3>
          <AddItem addItem={value => this._addItem(value)} placeholder="Add a task" />
          <TodoItems
            todoListItems={this.state.items}
            removeItem={id => this._deleteItem(id)}
            checkItem={id => this._checkItem(id)}
          />
        </div>
      )
    }
  }
}
Here, it works almost the same way as the index page, except that first we try to retrieve the TodoList object corresponding to the ID passed as a parameter. Then, if an object exists for this ID, we retrieve all TodoItems objects attached to it.
To finish, replace the code for the _addItem, _deleteItem, and _checkItem methods.
async _addItem(value){
    if(value.length > 0){
        var TodoItem = Parse.Object.extend("TodoItems");
        var todoItem = new TodoItem();
        todoItem.set("label", value);
        todoItem.set("isDone", false);
        todoItem.set("todoList",this.state.todoList);
        try{
            var res = await todoItem.save();
            this.setState({
                items:[ res, ...this.state.items ]
            });
        }catch(error){
            alert(error.message);
        }
    }
  }

  async _deleteItem(id){
    const idx = this.state.items.findIndex((obj)=>obj.id == id);
    const currentItem = this.state.items.find((obj)=>obj.id == id);
    try{
        await currentItem.destroy();
        this.setState({
            items: this.state.items.slice(0,idx).concat(this.state.items.slice(idx+1))
        });
    }catch(error){
        alert(error.message);
    }
  }

  async _checkItem(id){
    const idx = this.state.items.findIndex((obj)=>obj.id == id);

    const updatedItems = [...this.state.items];
    const isDone = updatedItems[idx].get("isDone");
    updatedItems[idx].set("isDone", !isDone );

    try{
        await updatedItems[idx].save();
        this.setState({
            items:updatedItems,
        });
    }catch(error){
        alert(error.message);
    }
  }
There is one last point to address: for now, when a TodoList object is deleted, the TodoListItems objects attached to it are not deleted. To solve this problem, we will add a trigger when a TodoList object is deleted.
Add the following code to the main.js file located in Parse's cloud folder:
Parse.Cloud.afterDelete('TodoList', function (request) {
  query = new Parse.Query('TodoItems')
  query.equalTo('todoList', request.object)
  query.find({
    success: function (todoItems) {
      Parse.Object.destroyAll(todoItems, {
        success: function () {},
        error: function (error) {
          console.error('Error while deleting todo items ' + error.code + ': ' + error.message)
        },
      })
    },
    error: function (error) {
      console.error('Error while searching for todo items ' + error.code + ': ' + error.message)
    },
  })
})
Here we define a trigger that runs after a TodoList object is deleted. When it runs, it retrieves all TodoItems objects attached to it and deletes them.
We are done creating the Next application. In the next article, we will see how to add the application to our Docker configuration.