Hello everyone, today we are going to add navigation to our application. In this article we will look, without going into every detail, at how navigation works with react-navigation.
In our application we will use four navigation concepts: StackNavigator, TabNavigator, DrawerNavigator, and nested navigation.
StackNavigator
StackNavigator is the component that adds the most basic navigation to our application. The principle is as follows: we start from one screen, and each time we go to another screen it is added on top of the stack, creating a history that lets us go back.
TabNavigator
TabNavigator makes it easy to add tab navigation to our application. We only have to provide the screens, and it takes care of adding the tabs for us.
DrawerNavigator
DrawerNavigator adds the side menu we are used to seeing in mobile applications. The principle is similar to TabNavigator: pass it the screens and it creates the menu automatically.
NestedNavigation (nested navigation)
This principle, as its name indicates, consists of nesting several navigation elements inside each other. For example, in our application we will have a StackNavigator as the top-level navigator with a list of screens, and among those screens we will add one that will be either a TabNavigator for iOS or a DrawerNavigator for Android.
Here is a diagram showing how navigation will work inside our application:
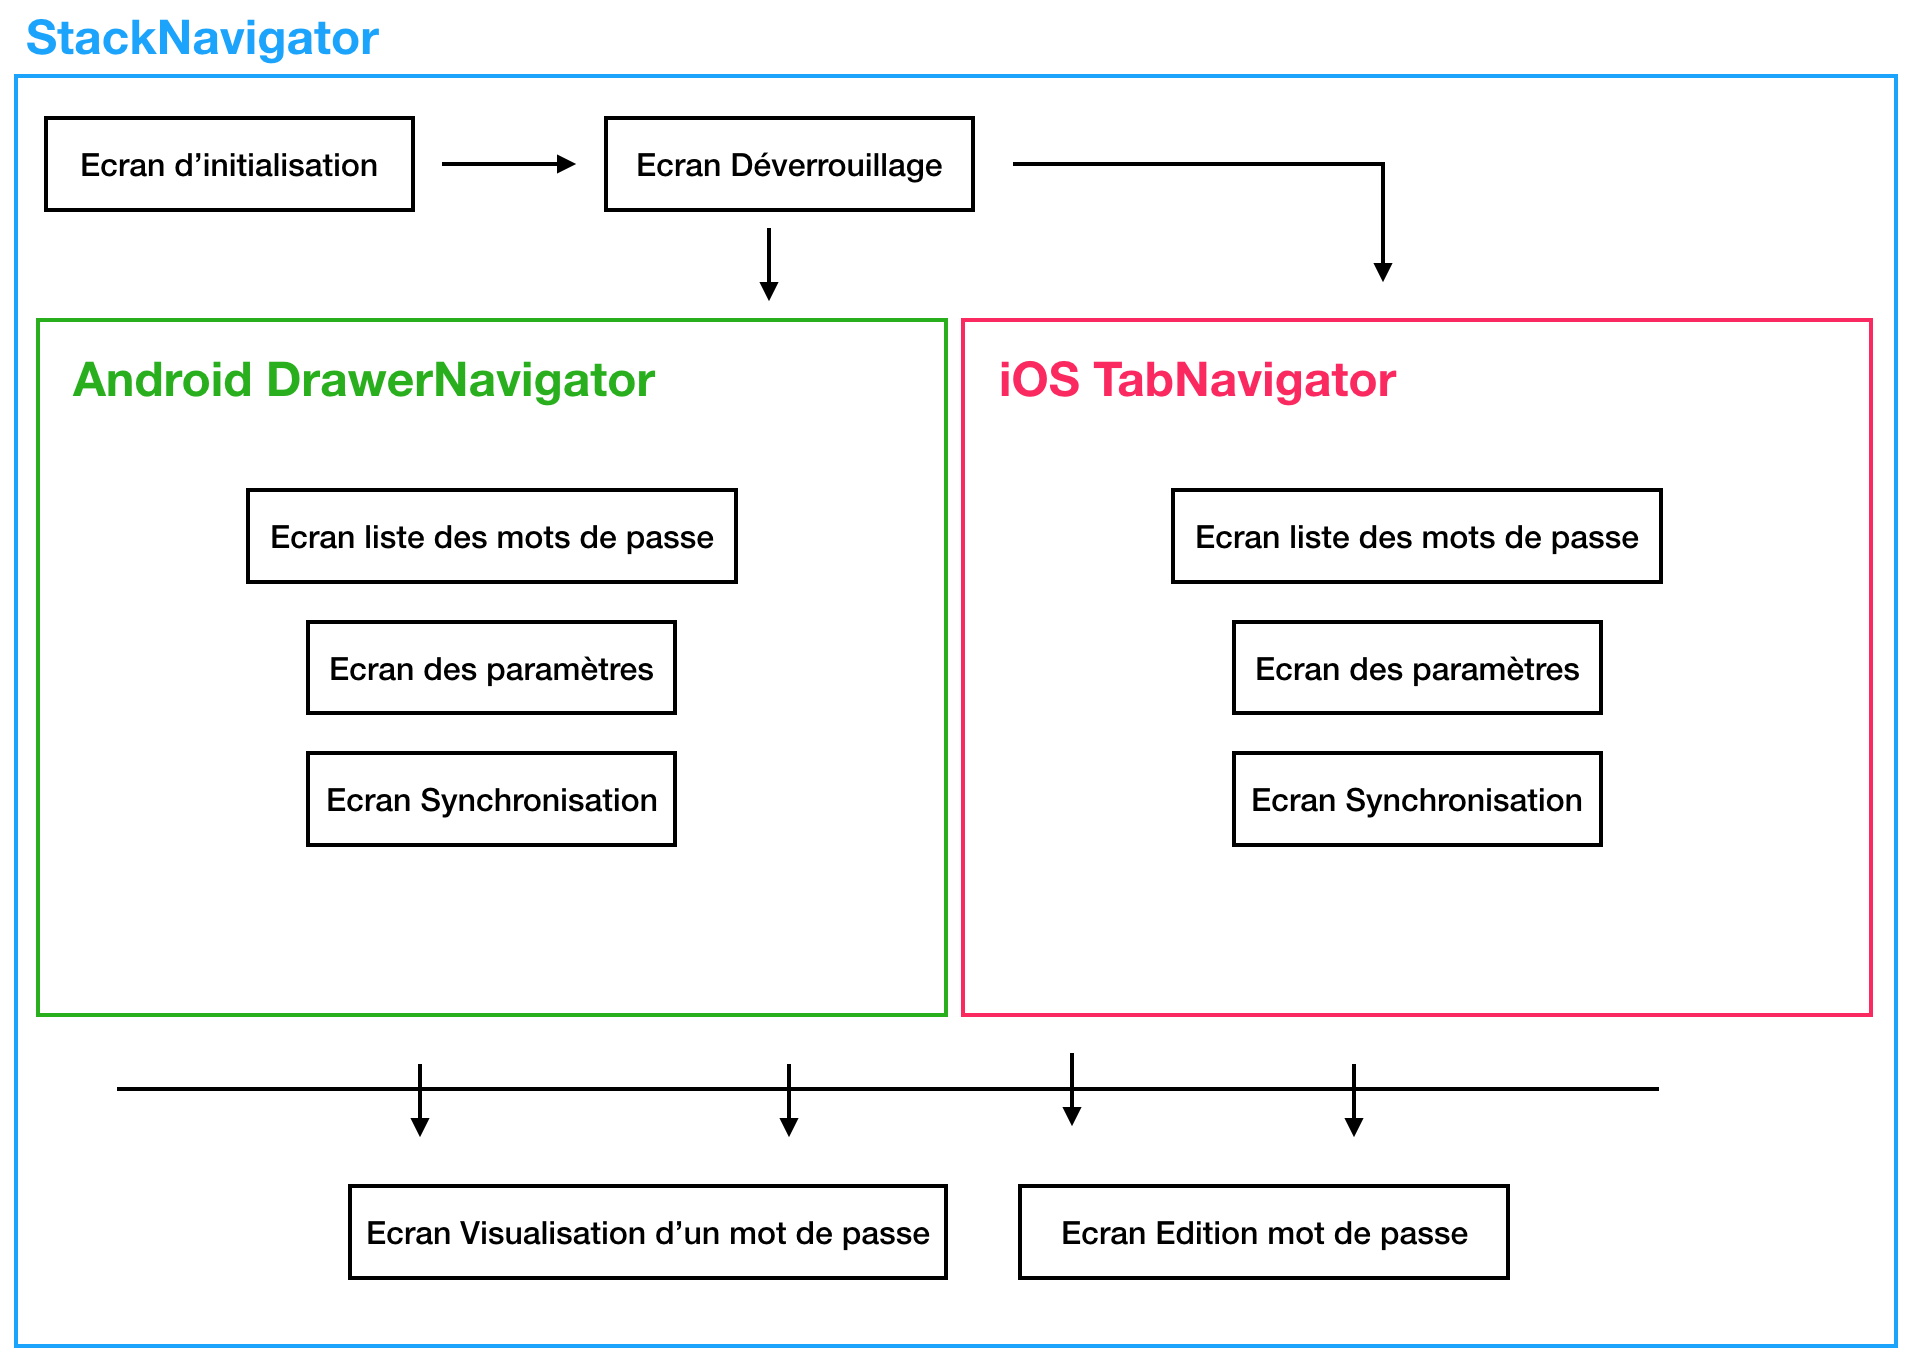
As you can see, our StackNavigator will handle the initialization, unlocking, password viewing, and password editing screens, as well as our TabNavigator/DrawerNavigator.
Finally, the password list, Settings, and Synchronization screens will be managed by the TabNavigator/DrawerNavigator.
Corrections to previous articles
Before moving on to navigation, there are two changes we need to make.
The first concerns the PasswordList component. When creating the components, I had us add the contentInset property and the defineContentInset function, explaining that part of the list would be truncated because of the height of the tabs.
That was a problem I had encountered while using the equivalent of TabNavigator with React Native's old navigation standard. The problem does not occur with react-navigation, so we can remove that property and that function from the component.
The second point concerns the navigation bar. It is generated automatically when we use StackNavigator and is added over our screens. However, it is not added when we use DrawerNavigator or TabNavigator, so we need to create it and add it to the following screens:
- Password list
- Settings
- Synchronization
In the components folder, create a NavBar folder and add the index.android.js and index.ios.js files.
Then add the following code to index.ios.js:
/*
 * @flow
 */

import React from 'react'
import { View, Text, TouchableOpacity, StyleSheet } from 'react-native'
import Icon from 'react-native-vector-icons/Ionicons'
import { IOS_FULL_HEIGHT, IOS_MARGIN, IOS_STATUS_BAR_HEIGHT, IOS_NAV_BAR_HEIGHT } from '../../constants/dimensions'
import { WHITE, PRIMARY } from '../../constants/colors'
import { IconPlateform } from '../../common/PlatformHelper'

type Props = {
  needIconLeft: boolean,
  needIconRight: boolean,
  iconLeft: string,
  iconRight: string,
  title: string,
  actionLeft: () => void,
  actionRight: () => void,
}

const touchableIOS = (icon: string, onPress: () => void, style: Object) => (
  <TouchableOpacity onPress={onPress} style={[styles.icon, style]}>
    <Icon name={IconPlateform(icon)} size={36} color={WHITE} />
  </TouchableOpacity>
)

const renderTouchable = (render: boolean, icon: string, onPress: () => void, style: Object) => {
  if (render) {
    return touchableIOS(icon, onPress, style)
  }
  return null
}

const NavBar = (props: Props) => (
  <View style={styles.container}>
    <View style={styles.content}>
      <View style={styles.iconContainer}>
        {renderTouchable(props.needIconLeft, props.iconLeft, props.actionLeft, {
          justifyContent: 'flex-start',
        })}
      </View>
      <Text style={styles.title}>{props.title}</Text>
      <View style={styles.iconContainer}>
        {renderTouchable(props.needIconRight, props.iconRight, props.actionRight, {
          justifyContent: 'flex-end',
        })}
      </View>
    </View>
  </View>
)

NavBar.defaultProps = {
  needIconLeft: false,
  needIconRight: false,
  iconLeft: 'arrow-back',
  iconRight: 'refresh',
  title: 'Title',
  actionLeft: () => console.log('left press'),
  actionRight: () => console.log('left press'),
}
export default NavBar

const styles = StyleSheet.create({
  container: {
    justifyContent: 'flex-start',
    height: IOS_FULL_HEIGHT,

    backgroundColor: PRIMARY,
  },
  content: {
    marginTop: IOS_STATUS_BAR_HEIGHT,
    paddingHorizontal: IOS_MARGIN,
    height: IOS_NAV_BAR_HEIGHT,
    justifyContent: 'space-between',
    alignItems: 'center',

    flexDirection: 'row',
  },
  title: {
    alignSelf: 'center',
    fontSize: 17,
    letterSpacing: 0.5,
    fontWeight: '600',
    color: WHITE,
  },
  iconContainer: {
    width: 50,
  },
  icon: {
    alignItems: 'center',
    flexDirection: 'row',
    width: 50,
  },
})
And this one for index.android.js:
/*
 * @flow
 */

import React from 'react'
import { StyleSheet } from 'react-native'
import Icon from 'react-native-vector-icons/Ionicons'
import { IconPlateform } from '../../common/PlatformHelper'
import { ANDROID_NAV_HEIGHT } from '../../constants/dimensions'
import { WHITE, PRIMARY } from '../../constants/colors'

type Props = {
  title: string,
  actionLeft: () => void,
  toolbarActions: Array<Object>,
  iconLeft: string,
  onActionSelected: (position: number) => void,
}

const NavBar = (props: Props) => (
  <Icon.ToolbarAndroid
    navIconName={IconPlateform(props.iconLeft)}
    onActionSelected={props.onActionSelected}
    onIconClicked={props.actionLeft}
    style={styles.toolbar}
    actions={props.toolbarActions}
    title={props.title}
    iconColor={WHITE}
    titleColor={WHITE}
  />
)

export default NavBar

NavBar.defaultProps = {
  title: 'Title',
  actionLeft: () => console.log('left click'),
  toolbarActions: [],
  iconLeft: 'menu',
  onActionSelected: position => console.log(`action idx${position}`),
}
// sample actions [{ title: 'Done', iconName: 'md-color-wand', show: 'always' }]

const styles = StyleSheet.create({
  toolbar: {
    backgroundColor: PRIMARY,
    height: ANDROID_NAV_HEIGHT,
  },
})
To save time, we use the ToolbarAndroid component provided by the react-native-vector-icons library.
Next, add the resources for the screen titles:
fr.js
...
// screen title
settings: 'Réglages',
passwordList: 'Mots de passe',
synchronization: 'Synchronisation',
edition: 'Edition',
creation: 'Ajouter un mot de passe',
en.js
...
// screen title
settings: 'Settings',
passwordList: 'Passwords',
synchronization: 'Synchronization',
edition: 'Edition',
creation: 'Add a new password',
strings.js
...
settings: I18n.t('settings'),
passwordList: I18n.t('passwordList'),
synchronization: I18n.t('synchronization'),
edition: I18n.t('edition'),
creation: I18n.t('creation'),
Now we will modify the different screens:
Settings.js
...
import NavBar from '../components/NavBar';
...
class SettingsScreen extends Component<void, void, State> {
  ...
  render() {
    return (
      <View style={styles.container}>
        <NavBar title={strings.settings} />
        <SliderRow
          label={strings.passwordLength}
          onValueChange={value => this.setPasswordLength(value)}
          selectedValue={this.state.passwordLength}
        />
        <CheckBoxRow
          label={strings.passwordAuto}
          iconName="star"
          isChecked={this.state.autoGeneration}
          switchValueChange={value => this.setAutoGeneration(value)}
        />
        <View style={styles.itemContainer}>
          <SettingRow
            label={strings.deleteAllPasswords}
            iconName="trash"
            iconBackground={DELETE_COLOR}
            iosOultine
            onPress={() => this.deleteAllPasswords()}
          />
        </View>
      </View>
    );
  }
}
...
Synchronization.js
...
import NavBar from '../components/NavBar';

export default class SynchronizationScreen extends Component {
 ...
  render() {
    return (
      <View style={styles.container}>
        <NavBar title={strings.synchronization} />
        <SettingRow
          label={strings.publish}
          iconName="cloud-upload"
          withSeparator
          iosOultine
          iosSeparator
          iconBackground={PRIMARY}
          onPress={() => this.uploadBackup()}
        />
        <SettingRow
          label={strings.pull}
          iconName="cloud-download"
          iosOultine
          iconBackground={PRIMARY}
          onPress={() => this.downloadBackup()}
        />
        <View style={styles.itmCtnr}>
          <SettingRow
            label={strings.deleteBackup}
            iconName="trash"
            iconBackground={DELETE_COLOR}
            iosOultine
            onPress={() => this.deleteBackup()}
          />
        </View>
      </View>
    );
  }
}
...
InitSynchronization.js
...
import NavBar from '../components/NavBar';
...
export default class InitSynchronizationScreen extends Component {
  ...
  render() {
    return (
      <View style={{ flex: 1 }}>
        <NavBar title={strings.synchronization} />
        <ScrollView contentContainerStyle={styles.container}>
          <Image style={styles.image} source={image} />
          <Text style={styles.title}>{strings.synchInstruction}</Text>
          <View style={styles.login}>
            <Button title={strings.login} onPress={() => console.log('log in dropbox')} />
          </View>
        </ScrollView>
      </View>
    );
  }
}
...
Finally, we will also add a navbar to the password editing screen so we can move the password generation button:
Edit.js
...
import NavBar from '../components/NavBar';
...
class ReadOnlyScreen extends Component<void, void, State> {
  ...
  render() {
    const { icon, color, name, password, login, url, modalIsOpen } = this.state;
    return (
      <View style={styles.main}>
        <NavBar
          title={strings.edition}
          needIconLeft
          needIconRight
          actionLeft={() => this.props.navigation.goBack()}
          actionRight={() => this.generatePassword()}
          iconLeft="arrow-back"
          onActionSelected={() => this.generatePassword()}
          toolbarActions={[{ title: strings.generate, iconName: 'md-refresh', show: 'always' }]}
        />

        <KeyboardAwareScrollView style={styles.scrollContent}>
          <View style={styles.container}>
            <View style={styles.iconCtnr}>
              <View style={styles.icon}>
                <IconPicker icon={icon} color={color} onPress={() => this.toggleModal()} />
              </View>
            </View>

            <TextField
              placeholder={strings.siteName}
              value={name}
              onSubmitEditing={() => this.urlField.focus()}
              onChangeText={text => this.setState({ name: text })}
              returnKeyType="next"
            />
            <TextField
              icon="globe"
              placeholder={strings.siteUrl}
              value={url}
              ref={(c) => {
                this.urlField = c;
              }}
              onSubmitEditing={() => this.loginField.focus()}
              onChangeText={text => this.setState({ url: text })}
              returnKeyType="next"
            />
            <TextField
              icon="person"
              placeholder={strings.userName}
              value={login}
              ref={(c) => {
                this.loginField = c;
              }}
              onSubmitEditing={() => this.passwordField.focus()}
              onChangeText={text => this.setState({ login: text })}
              returnKeyType="next"
            />
            <TextField
              icon="lock"
              placeholder={strings.password}
              value={password}
              ref={(c) => {
                this.passwordField = c;
              }}
              onChangeText={text => this.setState({ password: text })}
              secureTextEntry
            />
            <View style={styles.colorSelector}>
              <ColorSelector onPress={colorValue => this.selectColor(colorValue)} />
            </View>

            <View style={styles.actionContainer}>
              <Button title={strings.save} color={PRIMARY} onPress={() => this.save()} />
            </View>
          </View>
        </KeyboardAwareScrollView>

        <IconModal
          onSelectIcon={iconName => this.selectIcon(iconName)}
          isOpen={modalIsOpen}
          toggleModal={() => this.toggleModal()}
        />
      </View>
    );
  }
}
...
Here we can see that to go back we use this.props.navigation.goBack. Once we use StackNavigator, each screen listed in the routes receives a navigation prop that lets it interact with the navigation API.
Navigation
We can now focus on navigation. First we will create the TabNavigator and the DrawerNavigator, then we will add the StackNavigator and navigation between the different screens.
TabNavigator
In the screens folder, add a TabNavigator.js file and add the following code:
/*
 * @flow
 */

import React from 'react'
import { TabNavigator } from 'react-navigation'
import Icon from 'react-native-vector-icons/Ionicons'
import PasswordsScreen from '../screens/Passwords'
import SettingsScreen from '../screens/Settings'
import SynchronizationScreen from '../screens/Synchronization'
import { PRIMARY, IOS_TABICON, WHITE } from '../constants/colors'
import strings from '../locales/strings'

const tabNavigator = TabNavigator(
  {
    Passwords: {
      screen: PasswordsScreen,
      navigationOptions: () => ({
        tabBarLabel: strings.passwordList,
        tabBarIcon: ({ tintColor }) => <Icon name="ios-apps-outline" color={tintColor} size={26} />,
      }),
    },
    Settings: {
      screen: SettingsScreen,
      navigationOptions: () => ({
        tabBarLabel: strings.settings,
        tabBarIcon: ({ tintColor }) => <Icon name="ios-options-outline" color={tintColor} size={26} />,
      }),
    },
    Synchronization: {
      screen: SynchronizationScreen,
      navigationOptions: () => ({
        tabBarLabel: strings.synchronization,
        tabBarIcon: ({ tintColor }) => <Icon name="ios-cloud-outline" color={tintColor} size={26} />,
      }),
    },
  },
  {
    tabBarPosition: 'bottom',
    animationEnabled: true,
    tabBarOptions: {
      activeTintColor: PRIMARY,
      inactiveTintColor: IOS_TABICON,
      labelStyle: { fontSize: 13 },
      style: { backgroundColor: WHITE },
    },
  }
)
export default tabNavigator
Let's look at what we have in this component. First, we import the necessary libraries, all the screens, and the resources.
Then we define our TabNavigator with all the routes.
Passwords: {
  screen: PasswordsScreen,
  navigationOptions: () => ({
    tabBarLabel: strings.passwordList,
    tabBarIcon: ({ tintColor }) => <Icon name="ios-apps-outline" color={tintColor} size={26} />,
  }),
},
In this example we have the Passwords route. The screen attribute lets us define which screen should be displayed. Then we have the navigation options: the first is the label displayed below the icon in the tabBar, and the second is the icon. Here we display an Icon from react-native-vector-icons, but we could also choose to display an image.
We also pass the tintColor variable, which lets us have dynamic colors according to the TabBar style, as we will see below:
{
  tabBarPosition: 'bottom',
  animationEnabled: true,
  tabBarOptions: {
    activeTintColor: PRIMARY,
    inactiveTintColor: IOS_TABICON,
    labelStyle: { fontSize: 13 },
    style: { backgroundColor: WHITE },
  },
},
Here we have the TabBar properties: we define its position and enable animations. Then we define the TabBar options: the icon and text color when the tab is selected, and the color when it is not selected. These are the colors passed to the tintColor parameter we saw in the routes.
To test it, you can modify the index.js file at the root of src as follows:
/**
 * Sample React Native App
 * https://github.com/facebook/react-native
 * @flow
 */

import TabNavigator from './screens/TabNavigator'
export default TabNavigator
Even though we do not use this component on Android in our application, it is compatible with Android. You can launch an Android emulator to see the differences between the iOS and Android versions.
DrawerNavigator
Let's move on to DrawerNavigator. Still in the screens folder, add the DrawerNavigator.js file:
/*
 * @flow
 */

import React from 'react'
import { ScrollView, Image, StyleSheet, View } from 'react-native'
import { DrawerNavigator, DrawerItems } from 'react-navigation'
import Icon from 'react-native-vector-icons/Ionicons'
import PasswordsScreen from '../screens/Passwords'
import SettingsScreen from '../screens/Settings'
import SynchronizationScreen from '../screens/Synchronization'
import { PRIMARY, ANDROID_SEPARATOR } from '../constants/colors'
import strings from '../locales/strings'

const image = require('../img/book.png')

const DrawerContent = (props: Object) => (
  <ScrollView contentContainerStyle={styles.container}>
    <Image source={image} style={styles.logo} />
    <View style={styles.separator} />
    <DrawerItems {...props} />
  </ScrollView>
)

const drawerNavigator = DrawerNavigator(
  {
    Passwords: {
      screen: PasswordsScreen,
      navigationOptions: () => ({
        drawerLabel: strings.passwordList,
        drawerIcon: ({ tintColor }) => <Icon name="ios-apps-outline" color={tintColor} size={26} />,
      }),
    },
    Settings: {
      screen: SettingsScreen,
      navigationOptions: () => ({
        drawerLabel: strings.settings,
        drawerIcon: ({ tintColor }) => <Icon name="ios-options-outline" color={tintColor} size={26} />,
      }),
    },
    Synchronization: {
      screen: SynchronizationScreen,
      navigationOptions: () => ({
        drawerLabel: strings.synchronization,
        drawerIcon: ({ tintColor }) => <Icon name="ios-cloud-outline" color={tintColor} size={26} />,
      }),
    },
  },
  {
    drawerWidth: 300,
    contentComponent: props => DrawerContent(props),
    contentOptions: {
      activeTintColor: PRIMARY,
      style: {
        marginVertical: 0,
      },
    },
  }
)

const styles = StyleSheet.create({
  container: {
    flex: 1,
  },
  logo: {
    marginVertical: 32,
    alignSelf: 'center',
  },
  separator: {
    height: 1,
    backgroundColor: ANDROID_SEPARATOR,
    marginBottom: 32,
  },
})
export default drawerNavigator
DrawerNavigator works similarly to TabNavigator, both for routes and for options. The only different thing we did here is create a new DrawerContent component to replace the default one.
To test it, modify index.js like this:
/**
 * Sample React Native App
 * https://github.com/facebook/react-native
 * @flow
 */

import DrawerNavigator from './screens/DrawerNavigator'

export default DrawerNavigator
You will notice that currently the only way to display the menu is by sliding from left to right. In our searchBar and navBar we planned a button to display the menu, so we need to modify each screen to add the action that makes the menu appear.
To make the menu appear, the principle is the same as navigating from one screen to another, except that instead of specifying the route name we indicate that the menu should open or close.
The code is as follows:
this.props.navigation.navigate('DrawerOpen') // open drawer
this.props.navigation.navigate('DrawerClose') // close drawer
Once our screen is used in a navigator (StackNavigator, TabNavigator, etc.), it receives the navigation prop.
We will start by modifying the Passwords.js screen. In the openMenu method, replace the console log with:
this.props.navigation.navigate('DrawerOpen')Then, for the Settings.js, Synchronization.js, and InitSynchronization.js screens, add the following prop to the navBar:
actionLeft={() => this.props.navigation.navigate('DrawerOpen')}StackNavigator
To finish this article, we will add the StackNavigator and finalize navigation inside the application.
Modify the index.js file as follows:
/**
 * Sample React Native App
 * https://github.com/facebook/react-native
 * @flow
 */

import { Platform } from 'react-native'
import { StackNavigator } from 'react-navigation'
import DrawerNavigator from './screens/DrawerNavigator'
import TabNavigator from './screens/TabNavigator'
import UnlockScreen from './screens/Unlock'
import SetupScreen from './screens/Setup'
import ReadOnlyScreen from './screens/ReadOnly'
import EditScreen from './screens/Edit'
import strings from './locales/strings'

const NestedNav = Platform.OS === 'android' ? DrawerNavigator : TabNavigator

const App = StackNavigator({
  Setup: {
    screen: SetupScreen,
    navigationOptions: () => ({
      title: strings.setup,
      headerStyle: { backgroundColor: '#01D88D' },
      headerTintColor: 'white',
    }),
  },
  Unlock: {
    screen: UnlockScreen,
    navigationOptions: () => ({
      header: null,
    }),
  },
  App: {
    screen: NestedNav,
    navigationOptions: () => ({
      header: null,
    }),
  },
  ReadOnly: {
    screen: ReadOnlyScreen,
    navigationOptions: ({ navigation }: Object) => ({
      title: navigation.state.params.siteName,
      headerStyle: { backgroundColor: '#01D88D' },
      headerTintColor: 'white',
    }),
  },
  Edit: {
    screen: EditScreen,
    navigationOptions: ({ navigation }: Object) => ({
      header: null,
    }),
  },
})

export default App
Here we first import Platform from React Native as well as StackNavigator, then we import all of our screens, including TabNavigator and DrawerNavigator.
Because we want to use TabNavigator on iOS and DrawerNavigator on Android, we use Platform to determine which component will be used as nestedNavigation as follows:
const NestedNav = Platform.OS === 'android' ? DrawerNavigator : TabNavigatorFinally, we define all the StackNavigator routes. The principle is still similar to what we saw for TabNavigator and DrawerNavigator. Only the navigation options are different; let's look in detail at the differences between the routes:
Setup: {
 screen: SetupScreen,
 navigationOptions: () => ({
   title: strings.setup,
   headerStyle: { backgroundColor: '#01D88D' },
   headerTintColor: 'white',
 }),
},
This one is the most basic: we define the title displayed in the navBar automatically added by StackNavigator, along with its color and the title color.
Edit: {
  screen: EditScreen,
  navigationOptions: ({ navigation }: Object) => ({
    header: null,
  }),
},
In this example we only define the screen that should be used, and we indicate that we do not want a navBar by adding the header: null option.
Here we do not want a navBar because we already added it manually on the password editing screen.
ReadOnly: {
  screen: ReadOnlyScreen,
  navigationOptions: ({ navigation }: Object) => ({
    title: navigation.state.params.siteName,
    headerStyle: { backgroundColor: '#01D88D' },
    headerTintColor: 'white',
  }),
},
Here the principle is the same as in the first example, except that we retrieve the navigation object in the navigation options.
We will see it a little later in the article, but when we want to navigate to a screen it is possible to pass additional parameters to that screen. Retrieving the navigation object as in the route above will let us use the parameters passed when navigating to the screen. In our case, this lets us use the name of the site attached to the password in the navBar title.
Navigation between screens
Now that we have set up StackNavigator, we need to modify each screen to add navigation actions for moving between the different screens of our application.
We start with the Setup screen. First add the following import:
import { NavigationActions } from 'react-navigation'Then, in the submit function, add the following code:
const resetAction = NavigationActions.reset({
  index: 0,
  actions: [NavigationActions.navigate({ routeName: 'Unlock' })],
})
this.props.navigation.dispatch(resetAction)
Usually the simplest way to navigate from one screen to another is this:
this.props.navigation.navigate('RouteName')However, in this case the application keeps a navigation history and allows going back to the previous screen. In our application, once the user has configured their master password, we do not want them to be able to return to the setup screen. For that we need to reset navigation and therefore use one of the actions provided by react-navigation: reset.
For more information about the different action types, I invite you to consult the react-navigation documentation.
Next we will move to the unlocking screen. Add the following code to the submit function in Unlock.js:
this.props.navigation.navigate('App')Now let's move to the password list screen. Here we will make several changes:
- Replace the logs in the addNewItem function with:
this.props.navigation.navigate('Edit');
- Replace the logs in the showPassword function with:
this.props.navigation.navigate('ReadOnly', { siteName: password.name })Here, in addition to the route name, we pass the parameter used for the navBar title in the StackNavigator.
Finally, only the ReadOnly screen remains; replace the code of the editPassword function with the following code:
this.props.navigation.navigate('Edit')We have now finished the application's navigation.